Automating CSV Data Extraction for Visualization in Metabase using n8n
Learn how to automate CSV data extraction via SFTP and visualize it in Metabase using n8n.
Contents
This guide builds on my previous post about setting up Metabase as a Business Intelligence solution, covering how to automate the process of extracting data from a CSV file via SFTP, processing the relevant data, and uploading it to a PostgreSQL database for visualization in Metabase.
Scenario
I recently encountered a situation where a third-party system only provided CSV reports without a database or API connection. The volume of data in these CSVs made manual parsing impractical. The third party did offer the option to upload data to a dedicated SFTP server, which provided an opportunity to automate the workflow.
To streamline this, we’ll automate the process of transferring data from the SFTP server to PostgreSQL, which will then feed into Metabase for visualization. Since the data can be prone to errors, an easy-to-use interface is necessary to manage the entire process efficiently.
Workflow Overview
The automated workflow will look like this:
Tools Used
- SFTPGo – A quick and simple solution for setting up an SFTP server.
- PostgreSQL – The database that will store the processed data and is connected to Metabase for visualization.
- n8n – A fantastic automation tool that bridges the process by downloading the CSV from SFTP, parsing it, and uploading it to PostgreSQL. Prior knowledge of node-based logical connectors is handy, but the app is straightforward to use.
- Nginx Proxy Manager / Traefikwith SSL - TLS/HTTPS is required for n8n to work. Check out this guide to set up NPM.
- Docker and Docker Compose are required to deploy the stack.
What We’ll Cover
As I already explained how to install and set up Metabase in my previous post, this guide will focus on:
- Setting up the PostgreSQL database and connecting it to Metabase.
- Configuring SFTPGo with a user and uploading dummy CSV data.
- Setting up n8n to automate the process of downloading the CSV, parsing it, and uploading the data to PostgreSQL.
By the end of this guide, you’ll have a fully automated pipeline from CSV extraction to data visualization in Metabase.
Setting Up PostgreSQL
- Deploy PostgreSQL with Docker Compose:
cd ~
mkdir metabase_postgresql
cd metabase_postgresql
nano compose.yml
Create the compose.yml file.
services:
  postgres:
    image: postgres:14-alpine
    restart: always
    ports:
      - 5432:5432
    volumes:
      - postgresql:/var/lib/postgresql/data
    environment:
      - POSTGRES_PASSWORD=strongpassword
      - POSTGRES_USER=username
      - POSTGRES_DB=metabase
    networks:
      - shared_network

networks:
  shared_network:
    external: true

volumes:
  postgresql:
compose.yml
docker-compose up -d
Deploy the stack
- After deployment, navigate to Metabase and go to Settings > Admin Settings > Databases > Add Database.
- Type: PostgreSQL
- Display Name: Any name to identify the DB later.
- Host: IP or hostname of the postgreSQL service
- Port: 5432
- DB Name: metabase
- Username: username specified in the compose file
- Password: password specified in the compose file
Your PostgreSQL DB is now connected to Metabase.
Setting Up SFTPGo:
- Deploy SFTPGo with Docker Compose:
cd ~
mkdir metabase_sftpgo
cd metabase_sftpgo
nano compose.yml
Create the compose.yml file.
services:

    sftpgo:
        image: drakkan/sftpgo:v2.6
        container_name: sftpgo
        ports:
            - '8080:8080'
            - '2022:2022'
            - '2121:2121'
            - '10080:10080'
        volumes:
            - sftpgodata:/srv/sftpgo
            - sftpgohome:/var/lib/sftpgo
        environment:
            - SFTPGO_HTTPD_BINDINGS_0_PORT=8080
            - SFTPGO_HTTPD_BINDINGS_0_ADDRESS=0.0.0.0
            - SFTPGO_DATA_PROVIDER_CREATE_DEFAULT_ADMIN=true
            - SFTPGO_WEBDAVD_BINDINGS_0_PORT=10080
            - SFTPGO_FTPD_BINDINGS_0_PORT=2121
            - SFTPGO_FTPD_BINDINGS_0_FORCE_PASSIVE_IP='127.0.0.1:8080'
        restart: always
        networks:
            - shared_network

volumes:
    sftpgodata:
    sftpgohome:

networks:
  shared_network:
    external: true
compose.yml
docker-compose up -d
Deploy the stack
- Map the IP and port in NPM and visit the SFTPGo portal. It will prompt you to create an admin account.
- After logging in, create the first user by navigating to Users > Add User.
- Enter the username, password or SSH key.
- Scroll down to File System to select your desired storage. I went with Local.
- Add the root directory (this must be an absolute path, eg.: /srv/sftpgo/data/useraccount)
- Test the connection by either connecting to the SFTP traditionally and uploading a file, or using SFTPGo's client portal. To do this, log out of the admin panel and switch to the WebClient option and sign in with the new user account.
Setting Up n8n
- Deploy n8n with Docker Compose:
cd ~
mkdir metabase_n8n
cd metabase_n8n
nano compose.yml
Create the compose.yml file.
services:
  n8n:
    image: n8nio/n8n:latest
    ports:
      - "5678:5678"
    environment:
      - GENERIC_TIMEZONE=Europe/London
      - TZ=Europe/London
    volumes:
      - n8n_data:/home/node/.n8n
    networks:
      - shared_network

volumes:
  n8n_data:

networks:
  shared_network:
    external: true
compose.yml
docker-compose up -d
Deploy the stack
- Map the IP and port in NPM and visit the n8n portal. It will prompt you to create an admin account.
- Sign in and create a new workflow from scratch. Here's a workflow to be created:
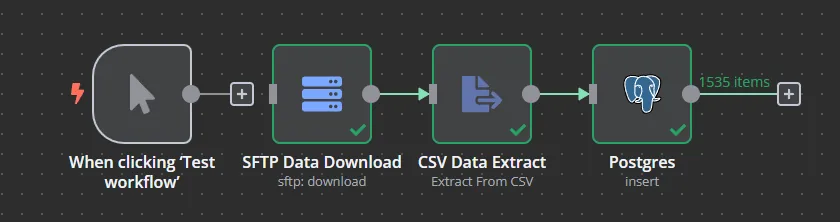
- For now, the trigger will remain manual launch and will later be replaced with a time-based schedule trigger.
- Click the + to add a new node and select FTP, then select Download File.
- Create a new set of credentials for your SFTP server. Give it a unique name as the credentials are not tied to a specific workflow and they can be reused later. After adding the credentials, n8n will automatically test the connection.
- Operation: Download
- Path: If you haven't configured a specific path in SFTPGo, the default path will be the root folder of SFTPGo (since SFTPGo is a container and uses translated paths, its root folder will actually be the user's root folder), so just leave it as /
- Put Output File in Field: the name of the downloaded file. Give it a distinct name.
- Test the step.
- Click the + icon to add a new node and select Extract from File > Extract from CSV.
- In the Input Binary Field, specify the name of the file and ensure it is the same name that was used in the previous step, under the Output File name.
- Test the step.
- Click the + icon to add a new node and look for Postgres >Insert rows in a table.
- Add the PostgreSQL credentials (as found in the PostgreSQL Docker compose) to Credential to Connect with > Create new Credential. n8n will test the connection on save. As mentioned above, give the credential a distinct name as it can be reused later on, outside this specific workflow.
- Operation: Insert
- Schema: From List > Public
- Table: From List > Select your table.
- Mapping Column Mode: Map Automatically
- Click Test Step.
- Save the workflow and click Test Workflow.
Wrapping Up
n8n will now automatically extract the CSV from the SFTP server and add the data to the table, which can then be used by Metabase to build reports.
This was my first 'emergency' introduction to n8n, and I’ll definitely continue using this tool for other personal and business workflows. It's a fantastic addition to the IT toolkit! 😊