Building an ESP32 Drone
Modular, hackable, and a fun intro to low-level flight control.
Contents
Lately, I’ve been exploring specialised microcontrollers and stumbled upon something I couldn’t resist, an ESP32-powered drone. I picked up the ESP32-S2-Drone V1.2, and I thought I’d document the build for anyone curious about tinkering with microcontroller-based flight.

The Hardware
The drone is modular, consisting of a mainboard and optional extension boards that expand its flight capabilities. Here’s a quick breakdown of the components:
| No. | Modules | Main Components | Function | Interfaces | Mount Location |
|---|---|---|---|---|---|
| 1 | Main board - ESP32-S2 | ESP32-S2-WROVER + MPU6050 | Basic flight | I2C, SPI, GPIO, extension interfaces | — |
| 2 | Extension board - Position-hold module | PMW3901 + VL53L1X | Indoor position-hold flight | SPI + I2C | Mount at bottom, facing the ground |
| 3 | Extension board - Pressure module | MS5611 | Height-hold flight | I2C or MPU6050 slave | Top or bottom |
| 4 | Extension board - Compass module | HMC5883 | Advanced flight modes like head-free | I2C or MPU6050 slave | Top or bottom |
I didn’t buy the extra modules for position- or height-hold, so I’ve only been testing basic flight.
- Main Board – ESP32-S2-WROVER + MPU6050ESP32-S2-WROVER: This is the main microcontroller. It handles all the logic, communication, sensor data processing, and control of the drone’s flight.MPU6050: A 6-axis motion tracking sensor that combines a 3-axis gyroscope and a 3-axis accelerometer. It helps the drone understand its orientation and movement in 3D space, which is critical for flight stabilization.
- Position-Hold Module – PMW3901 + VL53L1X (Optional)PMW3901: An optical flow sensor that detects motion by analyzing changes in visual patterns. It helps the drone stay in place by understanding how it's moving relative to the ground.VL53L1X: A time-of-flight laser distance sensor that measures height from the ground very precisely. When combined with the PMW3901, it allows for indoor position hold, keeping the drone stable without GPS.
- Pressure Module – MS5611 (Optional)A high-resolution barometric pressure sensor used to measure altitude. It helps maintain a consistent flight height over time, even in small fluctuations of air pressure.This module can work independently via I2C or piggyback on the MPU6050's bus.
- Compass Module – HMC5883 (Optional)A 3-axis digital magnetometer that functions as a compass. It helps the drone determine its heading relative to magnetic north.This is essential for advanced modes like head-free mode, where flight controls remain consistent regardless of the drone’s orientation.
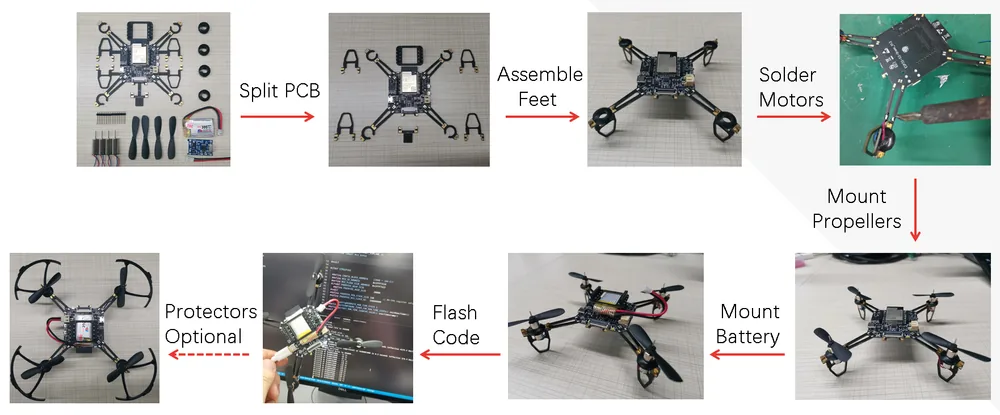
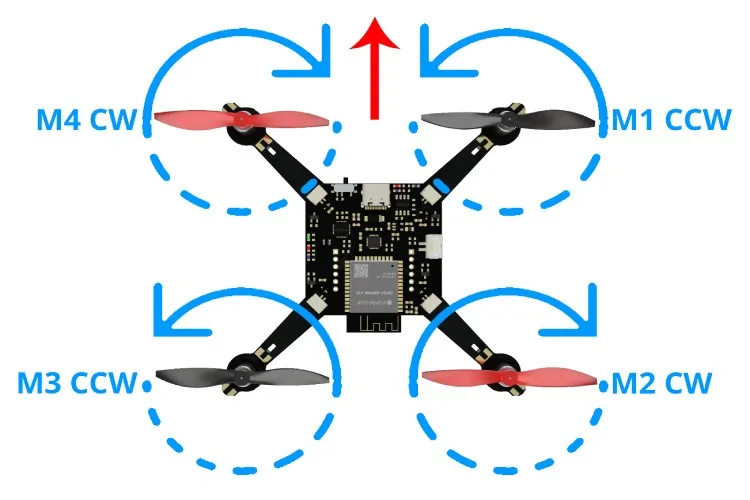
The instructions are straightforward, but it fails to mention the allocation of the motors. From top left to bottom right, you should install the motors in this order: blue, black, black, blue.
This board also accepts a camera module besides the add-on boards, so I added a 8225N V2.0 to the build:
Getting Started: Environment Setup
This project is built on ESP-IDF. ESP-IDF stands for Espressif IoT Development Framework. It's the official development framework for programming ESP32, ESP32-S2, and other Espressif chips. Think of it as a full SDK that lets you build firmware and applications for your ESP devices.
Here’s what it includes:
- Toolchain: Compiler, debugger, and build tools.
- Drivers: For Wi-Fi, Bluetooth, sensors, SPI, I2C, and more.
- RTOS Support: Built on FreeRTOS, which allows for real-time multitasking.
- Menuconfig: A powerful configuration interface (like the one you used to change board settings).
- Flashing & Monitoring Tools: Flash firmware, monitor logs, and debug via USB.
Unlike simpler platforms like Arduino, ESP-IDF gives you lower-level control, better performance, and more flexibility, especially useful for complex projects like a drone. If this is your first time using ESP-IDF, take a moment to read the official docs.
Before anything else, you’ll need to set up the ESP-IDF development environment.
- Download and install ESP-IDF 5.0, then launch the CMD
- Clone the ESP-Drone Repository:
git clone https://github.com/espressif/esp-drone.git
cd esp-drone
I noticed that some parts of the official ESP-Drone documentation are a bit outdated. The current master branch relies on ESP-IDF 5.0, which isn't compatible with this drone version and my first build failed due to missing dependencies.
To get things working, I had to roll back to a previous commit:
git checkout 5e88fce
Then set the correct target chip before building:
idf.py set-target esp32s2
Configure the Build
Launch the configuration menu:
idf.py menuconfig
- Navigate to ESPDrone Config
- Set hardware version to "ESP-Drone with ESP32 S2/S3 board"
- Set motor config to 715 motor
- Set your AP SSID/password if you want the drone to broadcast custom Wi-Fi, otherwise the default credentials are in the documentation.
Build and Flash
idf.py build
idf.py -p COM9 flash # Replace COM9 with your device's port
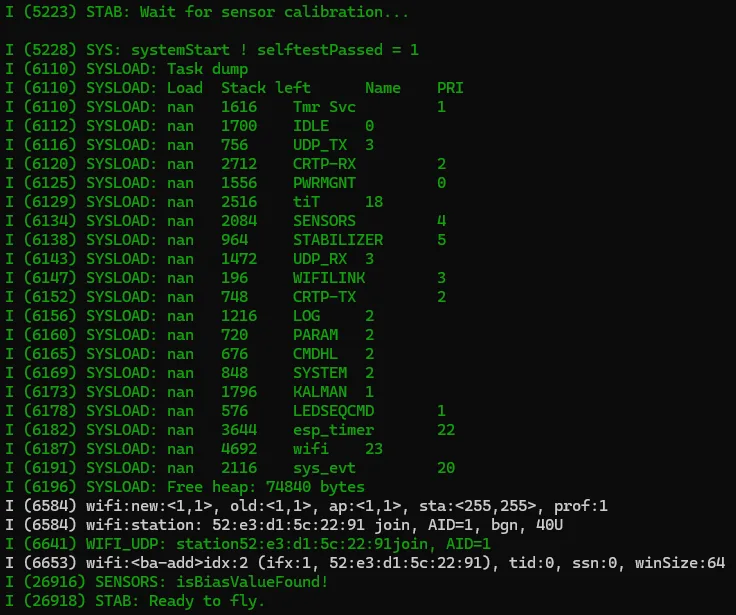
idf.py -p COM9 monitor
Download the App
You’ll need the ESP32 Drone app (available for Android and iOS) to control the drone.
Powering the Drone
USB alone won’t power the motors! You’ll need a battery. I first tried a 3.7V 300mAh LiPo battery with a PH1.25 connector, but it didn’t fit. I switched to a plastic spring clip battery holder for a single 18650 cell and added a rechargeable 18650 battery. This setup gives me around 30 minutes of flight time and lets me easily swap out cells for recharging.
Adding Camera Support
If you want to stream or capture footage from your drone, the ESP32 can handle it. Here’s how I added a camera:
- Enable PSRAM Open
idf.py menuconfig, then: - Enable Component Config > PSRAM
- Set Flash and PSRAM frequencies to 80MHz
- Initialize the Camera
Include the Camera Header in Your Code In your main.c, add:
#include "esp_camera.h"
Add the esp32-camera component
idf.py add-dependency "espressif/esp32-camera==2.0.4"
camera_config_t camera_config = {
    .pin_pwdn       = -1,
    .pin_reset      = 18,
    .pin_xclk       = 16,
    .pin_sscb_sda   = -1,
    .pin_sscb_scl   = -1,
    .pin_d7         = 19,
    .pin_d6         = 21,
    .pin_d5         = 17,
    .pin_d4         = 15,
    .pin_d3         = 46,
    .pin_d2         = 45,
    .pin_d1         = 33,
    .pin_d0         = -1,
    .pin_vsync      = 13,
    .pin_href       = 14,
    .pin_pclk       = 20,
    .xclk_freq_hz   = 20000000,
    .ledc_timer     = LEDC_TIMER_0,
    .ledc_channel   = LEDC_CHANNEL_0,
    .pixel_format   = PIXFORMAT_JPEG,
    .frame_size     = FRAMESIZE_QVGA,
    .jpeg_quality   = 12,
    .fb_count       = 1
};

esp_err_t cam_err = esp_camera_init(&camera_config);
if (cam_err != ESP_OK) {
    printf("Camera init failed: 0x%x\n", cam_err);
} else {
    printf("Camera init successful!\n");
}
- Rebuild and Flash Again
idf.py set-target esp32s2
idf.py build
idf.py -p COM9 flash
This will only initialise the camera, I then added a live MJPEG stream I can view using my browser, very similar to previous ESP32 camera projects.
Conclusion
This project was a great entry point into the world of drones. It was fun, hands-on, and gave me a solid understanding of how flight control systems work at a low level. The ESP32 has its limitations, especially with its Wi-Fi-based control and limited range, but it was more than enough to spark my interest. In fact, I ended up getting a DJI drone not long after this!
Happy flying! ✈️