Building an IoT Doorbell with AI
A no-cloud, no-subscription, no-nonsense doorbell that works with Frigate and Home Assistant.
For the longest time, I’ve been searching for a doorbell that seamlessly integrates with my existing home automation setup; something that isn’t battery-powered, cloud-dependent, or subscription-based. Since I couldn’t find one that met all my requirements, I decided to build my own.
This doorbell leverages the smart home infrastructure I’ve already set up, integrating with Home Assistant and Frigate.

How It Works
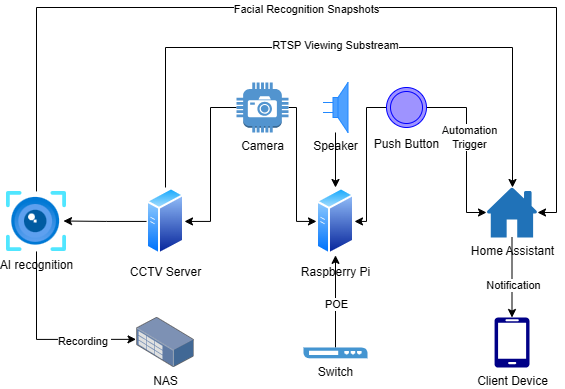
The system consists of a camera, speaker, and a momentary push button, all connected to a Raspberry Pi 4B. The Pi is powered via Power over Ethernet using a PoE hat, reducing the need for extra cables.

Video Processing & Motion Detection
- The camera’s feed is streamed via RTSP to Frigate, which restreams it and detects movement.
- When motion is detected, Frigate forwards the frame to Double Take, which then sends it to DeepStack for facial recognition.
- Since Frigate’s built-in movement detection can be unreliable, this method ensures accurate person detection.
- This setup allows recording to be triggered only when a person or a dog is present, instead of continuous recording.
Doorbell Functionality
- When the doorbell button is pressed, a Python script on the Pi:
- Plays a doorbell sound through the USB speaker.
- Sends a webhook notification to Home Assistant.
- Home Assistant then:
- Captures a snapshot from the camera at the moment the button is pressed.
- Plays a notification sound on indoor Sonos speakers.
- Sends a push notification to mobile devices with the captured photo.
Hardware Requirements
- Raspberry Pi (3B+ or newer) – The original plan was to use an ESP32-S3-POE-ETH-CAM, but I couldn't get the camera to work with ESPHome. This would have significantly reduced the footprint. Update 27/02; the ESP board now appears to have workarounds if you want to explore that route. I will be repurposing mine for another project.
- PoE Hat – Powers the Pi through the network switch. I went for the C variant, as it provides a 12V output for potential future upgrades, like a solenoid lock. PoE Hat Link
- Momentary Push Button – I used a 30mm 3-6V yellow LED button, making it easy to spot for delivery drivers and nighttime visitors. Button Link
- USB Speaker – Added at the last minute for audio feedback when the button is pressed. USB Speaker Link
- USB Camera – A 160-degree wide-angle camera for better visibility. USB Camera Link
- Custom 3D-Printed Case – Designed and printed for this setup, the STLs can be downloaded from here. I coated the PLA with epoxy resin to make it waterproof.


Software Requirements
- Raspberry Pi OS – Runs the Python script that handles the button press.
- Frigate – For motion detection and real-time object tracking. This guide assumes Frigate is already set up in your environment. You can follow this post to set it up.
- Double Take + DeepStack – For more reliable facial detection. This guide assumes DT and DS are already set up in your environment. You can follow this post to set it up.
- Home Assistant – Handles automation, notifications, and smart home integration. Also assumed to be part of your existing environment.
Hardware Setup
To connect the doorbell button, here’s the wiring breakdown:

Button LED Pins:
- + (Top): Connect to 3.3V (pin 1) on the Raspberry Pi.
- - (Bottom): Connect to GND (pin 6).
Button Control Pins:
- NO (Left): Connect to GPIO27 (pin 13).
- NO (Right): Connect to GND (pin 14).
The LED inside the button remains powered at all times using the + and - connections. The button state (pressed or not) is detected through the NO terminals, which complete the circuit when pressed.
USB Device Check:
Before proceeding, ensure that the USB camera and USB speaker are correctly recognised by the Raspberry Pi:
lsusb
If they appear in the list, they are successfully connected and ready for use. Check dmesg logs if the camera and speaker are not listed.
Software Setup
Python Script: doorbell.py
This script handles RTSP streaming, button press detection, webhook triggering, and playing a doorbell sound.
- The
RTSPServerclass initializes an RTSP stream using GStreamer. The stream is served viaGstRtspServer, making it accessible to devices on the network. - The
ButtonMonitorclass sets up the GPIO pin and continuously checks for button presses. - When the button is pressed, the script:
- Sends a webhook notification to Home Assistant.
- Plays a sound file using
pygame.mixer.
- The RTSP server runs in a separate thread to ensure continuous video streaming while monitoring the button in the main loop.
import gi
import RPi.GPIO as GPIO
import time
import requests
import threading
import pygame
from gi.repository import Gst, GstRtspServer, GObject

# RTSP class
class RTSPMediaFactory(GstRtspServer.RTSPMediaFactory):
    def __init__(self):
        super(RTSPMediaFactory, self).__init__()

    def do_create_element(self, url):
        pipeline = (
            "v4l2src device=/dev/video0 ! video/x-raw, width=640, height=480, framerate=30/1 "
            "! videoconvert ! x264enc tune=zerolatency speed-preset=ultrafast bitrate=500 "
            "! rtph264pay config-interval=1 pt=96 name=pay0"
        )
        return Gst.parse_launch(pipeline)

class RTSPServer:
    def __init__(self):
        self.server = GstRtspServer.RTSPServer()
        self.server.set_service("8554")
        factory = RTSPMediaFactory()
        factory.set_shared(True)
        mount_points = self.server.get_mount_points()
        mount_points.add_factory("/stream", factory)
        self.server.attach(None)
        print("RTSP Stream running at rtsp://YOUR-PI-IP:8554/stream")

# Button class
class ButtonMonitor:
    BUTTON_PIN = 27  # GPIO pin for the button
    WEBHOOK_URL = "http://YOUR-HA-IP:8123/api/webhook/doorbell-button-notification"
    SONG_PATH = "/home/pi/doorbell.mp3" #Upload your doorbell sound file here

    def __init__(self):
        GPIO.setmode(GPIO.BCM)
        GPIO.setup(self.BUTTON_PIN, GPIO.IN, pull_up_down=GPIO.PUD_UP)
        self.button_pressed = False

        # pygame mixer for playing sound
        pygame.mixer.init()
        pygame.mixer.music.load(self.SONG_PATH)

    def send_webhook(self):
        try:
            response = requests.post(self.WEBHOOK_URL)
            if response.status_code == 200:
                print("webhook sent successfully")
            else:
                print(f"Failed to send webhook: {response.status_code}")
        except requests.exceptions.RequestException as e:
            print(f"Error sending webhook: {e}")

    def play_sound(self):
        pygame.mixer.music.play()
        while pygame.mixer.music.get_busy():
            time.sleep(0.1)

    def monitor_button(self):
        try:
            while True:
                button_state = GPIO.input(self.BUTTON_PIN)
                if button_state == GPIO.LOW and not self.button_pressed:
                    print("Button pressed")
                    self.send_webhook()
                    self.play_sound()
                    self.button_pressed = True
                elif button_state == GPIO.HIGH and self.button_pressed:
                    self.button_pressed = False
                time.sleep(0.1)
        except KeyboardInterrupt:
            print("Exiting")
        finally:
            GPIO.cleanup()

if __name__ == "__main__":
    GObject.threads_init()
    Gst.init(None)

    # Start RTSP server in a separate thread
    rtsp_server = RTSPServer()
    threading.Thread(target=lambda: GObject.MainLoop().run(), daemon=True).start()

    #start button monitoring
    button_monitor = ButtonMonitor()
    button_monitor.monitor_button()
Autostart on Boot
To ensure the script runs automatically at start up, create a launcher script:
launcher.sh
#!/bin/sh
cd ~
python3 /home/pi/doorbell.py
Make the script executable:
chmod +x ~/launcher.sh
Run:
crontab -e
Add the following line at the bottom to execute launcher.sh on every reboot:
@reboot sh /root/launcher.sh
Setting Up the Camera in Frigate
Frigate needs to be configured to use the RTSP stream from the Raspberry Pi. Modify the frigate.yml configuration file and add the doorbell:
go2rtc:
  streams:
    Doorbell:
      - rtsp://YOUR-PI-IP:8554/stream

cameras:
  Doorbell:
    ffmpeg:
      inputs:
        - path: rtsp://127.0.0.1:8554/Doorbell
          input_args: preset-rtsp-restream
          roles:
            - record
            - detect
Restart Frigate:
docker restart frigate
Adding the Camera to DoubleTake
To add facial recognition to the re-streamed RTSP stream from Frigate, update the Double Take config file with:
frigate:
  url: http://FRIGATE-IP:FRIGATE-PORT
  cameras:
    - Doorbell

detectors:
  deepstack:
    url: http://DEEPSTACK-IP:80
    key: <redacted>
    cameras:
      - Doorbell
And click Save Config and Restart in the GUI. After this, you can train Double Take to recognise you.
Integrating with Home Assistant
Adding the Camera Feed to Home Assistant
There are multiple ways to do this as we are already using Frigate and HA. If you already have cameras in HA, you will be familiar with the Frigate Card (recently rebranded to Advanced Camera Card) through the HACS Frigate integration. When reloading the integration, the feed should automatically show up in HA. This is what I use as I can also pull in each face recognised from Double Take and have it displayed as a badge:

Otherwise, you can add a WebRTC card and let Frigate handle the recording and facial recognition separately. Example of a custom YML:
  - type: custom:webrtc-camera
    url: rtsp://PI-IP:8554/stream
Home Assistant Automations
Triggering a Notification When the Doorbell is Pressed
In Home Assistant → Automations, create a new automation.
- When the automation is triggered by the doorbell being pressed, it plays a notification sounds across all speakers in parallel across the house. The yaml below is reduced to only one speaker as an example.
- A snapshot is then captured of the doorbell's view, saved and sent as a push notification to a mobile device.
alias: Doorbell Notification
description: ""
triggers:
  - trigger: webhook
    allowed_methods:
      - POST
      - PUT
    local_only: true
    webhook_id: yourwebhookid
conditions: []
actions:
  - parallel:
      - target:
          entity_id: media_player.yourspeaker
        data:
          media_content_id: media-source://media_source/local/notification.wav
          media_content_type: audio/x-wav
        metadata:
          title: notification.wav
          thumbnail: null
          media_class: music
          children_media_class: null
          navigateIds:
            - {}
            - media_content_type: app
              media_content_id: media-source://media_source
        action: media_player.play_media
    enabled: true
  - data:
      filename: /media/doorbell.jpg
    target:
      entity_id:
        - camera.doorbell
    action: camera.snapshot
  - action: notify.mobile_app_zsolts_iphone
    data:
      message: Someone’s at the door!
      title: Doorbell
      data:
        image: /media/local/doorbell.jpg
mode: single
Save the automation and the setup is complete.
Final Thoughts
This setup has been running very well for several weeks now, enduring storms and freezing temperatures without any issues. I'm also planning to use it to open a smart lock if a recognized person rings the doorbell. So far, it has exceeded my expectations, and I no longer have to worry about changing batteries. It’s been a reliable and fully integrated addition to my home infrastructure, and I’m pleased with how it turned out.