Infrastructure Monitoring with Checkmk
Get started with Checkmk for infrastructure monitoring and explore its key features.
Contents
What is Checkmk?
Monitoring your IT infrastructure is critical for maintaining uptime, security, and performance. Checkmk is an open-source monitoring tool designed to provide visibility into your IT infrastructure. It's used to monitor servers, networks, applications, and cloud environments. Checkmk offers both raw and enterprise editions, allowing users to choose a version that best suits their needs.
Checkmk supports agent-based and agentless monitoring, provides automatic detection of network devices, and offers various plugins for extended functionality. The platform can proactively monitor your systems, receive timely alerts, and take preventive actions before issues escalate.
Key Features of Checkmk
- Auto Discovery of Services: Automatically detects network devices and services, reducing the need for manual configuration.
- Customizable Dashboards: Create dashboards tailored to your specific needs, allowing you to visualize the health and performance of your infrastructure.
- Flexible Alerting and Notifications: Supports multiple notification methods, including email, SMS, and integrations with tools like Microsoft Teams and Slack.
- Scalable Monitoring: Capable of monitoring thousands of hosts and services with minimal resource consumption.
- Extensive Plugin Ecosystem: Offers a wide range of plugins to extend monitoring capabilities for different applications, databases, and hardware.
- Support for Both Agent-based and Agentless Monitoring: Offers flexibility in how devices are monitored, accommodating different security and infrastructure requirements.
- Built-in Reporting and Analytics: Provides detailed reports and insights to help with capacity planning and performance optimization.
- Security Features: Supports two-factor authentication (2FA) and secure web interfaces to ensure only authorized users can access monitoring data.
Setting Up Checkmk with Docker
To get started with Checkmk, we will deploy it using Docker. Docker simplifies the deployment process, allowing you to get Checkmk up and running quickly.
Here is a sample Docker Compose configuration file to deploy Checkmk:
version: '3.8'

services:
  monitoring:
    image: checkmk/check-mk-raw:2.3.0-latest
    container_name: monitoring
    ports:
      - "8011:5000"
      - "8012:8000"
    volumes:
      - monitoring:/omd/sites
      - /etc/localtime:/etc/localtime:ro
    tmpfs:
      - /opt/omd/sites/cmk/tmp:uid=1000,gid=1000
    restart: always

volumes:
  monitoring:
Retrieving the Default Admin Password
After deploying the container, Checkmk will generate a random password for the default admin account (cmkadmin). To retrieve this password, run the following command on your host machine:docker container logs monitoring
Alternatively, you can specify an environment variable in the Compose file to set a custom password:
environment:
  - CMK_PASSWORD='mypassword'
The output will display the admin username (cmkadmin) and the randomly generated password.
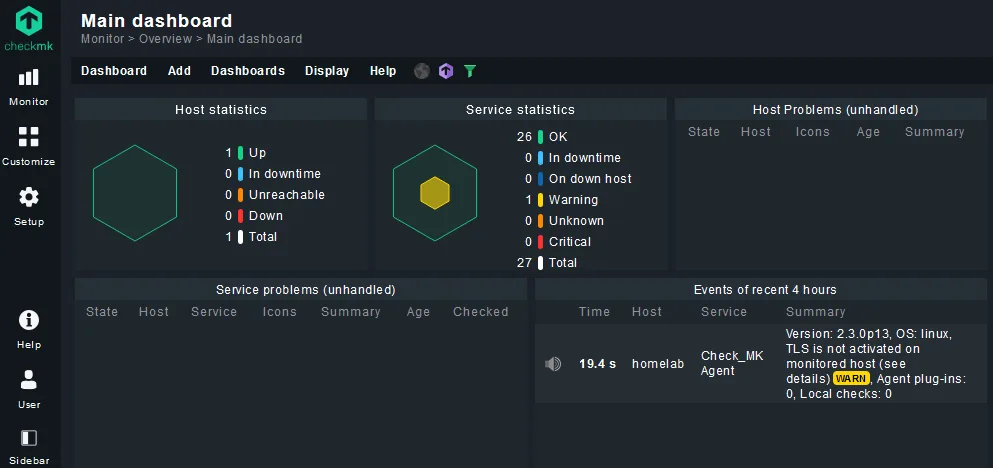
Accessing the Checkmk Web Interface
Once the container is running, visit {Host IP}:8012 to access the Checkmk web interface. Log in using the cmkadmin username and the password you retrieved earlier.
To enhance security, it's a good practice to change the default admin password right after the first login. Navigate to Setup > Users, select the cmkadmin user, and update the password. Additionally, enable two-factor authentication (2FA) by navigating to User > Two Factor Authentication.
Configuring Notifications via Microsoft Teams
One of the powerful features of Checkmk is its ability to integrate with various notification systems, including Microsoft Teams.
To configure notifications via Microsoft Teams, follow these steps:
Create a Webhook in Teams:
- Open Microsoft Teams (web version recommended as the desktop version does not support this fully).
- Create a new channel or select an existing one.
- Click the
+icon, then click Get More Apps and search for "Incoming Webhook." - Add it to the desired channel and copy the generated webhook URL.
Configure the Webhook in Checkmk:
- In Checkmk, navigate to Setup > Events > Notifications > Add Rule.
- Set a description like "Notify through Microsoft Teams."
- Under Notification Method, select the Webhook URL option and paste the URL you copied from Teams.
- Click Save to store the configuration.
Adding a Host to Checkmk
To start monitoring, add your first host—the server running Checkmk itself:
Install the Checkmk Agent:
- Download the agent from Setup > Agents > Linux in the Checkmk interface.
- Choose the appropriate package (e.g.,
.debfor Debian/Ubuntu) and copy the download link. - On your server, run the following command to download and install the agent:
wget https://yourdomain.com/cmk/check_mk/agents/check-mk-agent_2.3.0p13-1_all.deb -O check-mk-agent_2.3.0p13-1_all.deb && sudo dpkg -i check-mk-agent_2.3.0p13-1_all.deb
Add the Host in Checkmk:
- Go to Setup > Hosts > Add Host.
- Enter a hostname and the IP address of the server where the agent is installed.
- Checkmk will automatically discover services running on the host.
Monitor Discovered Services:
- Newly discovered services will appear under "Undecided Services."
- You can manually select which services to monitor or use the Monitor Undecided Services option to monitor all.
Applying Changes
Checkmk does not apply configuration changes automatically. To apply any pending changes, click on the X changes button (indicated by a yellow exclamation mark) in the top-right corner and confirm.
Testing Microsoft Teams Notifications
To ensure the Teams notification integration works correctly:
- Navigate to Setup > Events > Notification Configuration.
- Click Test Notification, select the newly added host, and trigger a test notification.
If everything is set up correctly, you should receive a notification in the configured Teams channel.
Conclusion
This guide covered the basic steps to set up Checkmk and start monitoring your infrastructure. Checkmk offers many more advanced features and customization options to suit various monitoring needs. To explore these additional features and fully understand how to utilize Checkmk to its fullest potential, visit the official Checkmk documentation.