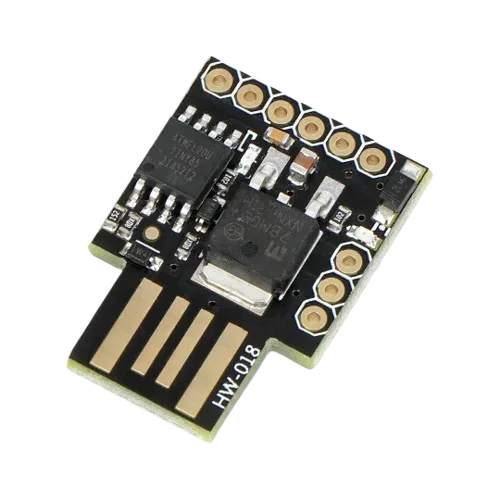
The Digispark ATtiny85 is a tiny, low-cost microcontroller board that can act as a USB HID. This means you can make it behave like a keyboard and automatically send keystrokes or commands to a computer as soon as it's plugged in.
In this post, I'll walk through setting up the board, installing the right drivers, and flashing a simple HID payload.
Disclaimer: This guide is for educational purposes only. BadUSB techniques can be misused, so do not run payloads on systems you do not own or have explicit permission to test.
A HID emulator like this can be used for many applications, including:
- Security awareness demos: Show staff how untrusted USB devices can pose real risks
- Automation: Preprogram repetitive keystrokes or quick shortcuts on test machines.
- Teaching tool: Great for demonstrating microcontroller programming and USB HID behavior in classrooms or workshops
- Red team exercises: In controlled, authorized environments, illustrate how BadUSB-style attacks work in practice
Step 1: Install Digispark Drivers
First, install the necessary Digispark drivers from here:
Digistump.Drivers.zip (1.6 MB)
Step 2: Add the Board Manager URL
- Open Arduino IDE.
- Go to File > Preferences.
- In the Additional Board Manager URLs field, paste this link:
http://drazzy.com/package_drazzy.com_index.json
Step 3: Install Digistump AVR Boards
- Open Tools > Board > Boards Manager.
- Search for digistump avr boards
- Select the package and click Install.
Use this package and not attinycore, as this includes HID drivers. The USB drivers should also install automatically. If not, use the drivers linked in Step 1 to install them manually.
Once installed, set your board to:
Tools > Board > Digispark (Default - 16.5 MHz)
Do not plug in the ATtiny85 yet.
Step 4: Write Your HID Code
Here’s an example script that opens a Run dialog, opens a site in Edge, then closes it:
#include "DigiKeyboard.h"

void setup() {
  DigiKeyboard.sendKeyStroke(0);
  DigiKeyboard.delay(500);

  // Win+R
  DigiKeyboard.sendKeyStroke(KEY_R, MOD_GUI_LEFT);
  DigiKeyboard.delay(400);

  // Open a benign training page (static query only)
  DigiKeyboard.print("msedge https://ambientnode.uk");
  DigiKeyboard.sendKeyStroke(KEY_ENTER);

  // Give the browser time to launch
  DigiKeyboard.delay(5000);

  // Close tab
  DigiKeyboard.sendKeyStroke(KEY_W, MOD_CONTROL_LEFT);
}

void loop() {}
Step 5: Compile and Upload
Uploading to the Digispark is slightly different than other Arduino boards:
- Click Upload in Arduino IDE.
- Only after compilation starts, a prompt will be shown to plug in the Digispark ATtiny85.
- The flashing process will run automatically.
Notes & Limitations
- Running commands like
cmdorpowershellis often blocked by antivirus software (flagged as Trojan, understandably). - Be mindful of startup delays; tune
DigiKeyboard.delay()values for reliability. - The DigiKeyboard library assumes a US layout. If you’re on a UK or other layout, special characters like
@or"might come out wrong.
3D-Printed Enclosure
You can house your Digispark in a fake USB stick case. Here’s a great printable model: Digispark ATtiny85 Enclosure (Bad USB Stick Fake)