Sponsor disclosure: The VPS used for this guide is sponsored by RackNerd. If you want a reliable VPS suitable for Pangolin, you can use my affiliate link.
What is Pangolin?
Pangolin is an open-source, identity-based remote access platform built on WireGuard. It combines two use cases into one control plane: a tunneled reverse proxy for web apps, and VPN-style access for private network resources, with centralized access control.
It is not just a reverse proxy UI. A traditional reverse proxy (Nginx, Traefik, Caddy, NPM) assumes your upstream services are routable from the proxy over normal IP networking. Pangolin adds a tunnel layer so your upstream services can stay on private RFC1918 space behind NAT, without opening inbound ports on the site network.
Pangolin vs Cloudflare Tunnel
Cloudflare Tunnel is a managed service, your connector makes an outbound connection to Cloudflare's edge, and Cloudflare brokers inbound user traffic through that tunnel. This means no inbound ports on your origin, plus Cloudflare's global edge, caching, and DDoS/WAF features if you enable them.
Pangolin flips the model:
- You run the control plane on a VPS you control (dashboard + routing).
- Your sites connect to you using WireGuard-based tunnels (Newt / Gerbil).
- You terminate TLS on your VPS (Traefik is typically used as the edge proxy in the self-host stack).
- You own the operational burden: patching, backups, logging, and hardening the VPS.
If you want maximum convenience and a global edge, Cloudflare Tunnel is hard to beat, but If you want to remove third-party dependency and keep traffic, auth, and routing fully under your control, Pangolin is the more comparable self-hosted solution.
Editions and deployment options
Pangolin is deployed in one of three ways:
- Self-host Community Edition
- Self-host Enterprise Edition
- Pangolin Cloud (managed)
This guide uses Community Edition.
How Pangolin works
The self-hosted Pangolin setup looks like this:
- User > VPS (HTTPS 443): A browser hits
https://app.example.com. Your VPS receives the traffic and terminates TLS (usually via Traefik with Let's Encrypt). - VPS routes to the right upstream: For local apps running on the VPS, it forwards directly. For private apps hosted in your homelab/office, it forwards into a tunnel.
- Tunnel layer (Gerbil + Newt)
- Newt runs inside the private network (as a Docker container or binary) and establishes a user-space WireGuard tunnel plus TCP/UDP proxying, so you do not manually build WireGuard interfaces, NAT, and routing.
- Gerbil on the VPS coordinates the tunnel endpoints and relays traffic as required.
- Pangolin’s dashboard acts as the control plane that ties identities, policies, Sites, and Resources together.
End-to-end: install Pangolin CE on a VPS
1) Prepare the VPS
Recommended OS: Ubuntu 20.04+ or Debian 11+.
Specs: 1 vCPU, 1 GB RAM, 10 to 20 GB disk is typically sufficient for Pangolin + Docker for small homelabs (scale up if you add many resources, users, and logs).
Update base packages:
sudo apt update
sudo apt upgrade -y
sudo apt install -y curl
Ports you must plan for
On the VPS firewall and your provider security rules, open:
80/tcpfor Let's Encrypt HTTP validation (if using HTTP-01)443/tcpfor dashboard + published HTTPS resources51820/udpfor Site tunnels (Newt to Gerbil)21820/udpfor Client tunnels (only needed if you use Pangolin clients relaying through Gerbil)
Check whether anything is already bound:
sudo ss -tulpn | egrep ':80|:443|:51820|:21820' || echo "No listeners on 80/443/51820/21820"
If you already run a reverse proxy (nginx/apache) on 80/443, stop it or move it off those ports.
If you use UFW:
sudo ufw allow 80,443/tcp
sudo ufw allow 51820/udp
sudo ufw allow 21820/udp
sudo ufw reload
Note: if you do not plan to use Pangolin desktop/mobile clients, you can often omit 21820/udp initially and add it later.
2) DNS setup
You need:
- A base domain:
example.com - A dashboard FQDN, for example
pangolin.example.com - Optional: a wildcard for resources, for example
*.example.com
Create records like:
pangolin.example.com>A>VPS_PUBLIC_IP- Optional:
*.example.com>A>VPS_PUBLIC_IP
Validate with:
dig +short pangolin.example.com
If you use Cloudflare DNS
For the initial install using Let's Encrypt HTTP-01, set the relevant records to DNS only so port 80 validation can reach your VPS. If you want to keep Cloudflare proxy enabled long-term, consider switching to DNS-01 later.
3) Download and run the Pangolin installer
Choose a working directory:
sudo mkdir -p /opt/pangolin
sudo chown "$USER":"$USER" /opt/pangolin
cd /opt/pangolin
Run the official quick installer per the docs (it downloads an installer binary and generates your Docker Compose stack):
curl -fsSL https://pangolin.net/get-installer.sh | bash
sudo ./installer
The quick install flow pulls and starts the main containers (Pangolin, Gerbil, Traefik).
4) Installer prompts
- Base domain: your root domain, for example
example.com - Dashboard domain: for example
pangolin.example.com - Let's Encrypt email: used for ACME issuance and operational notices
- Enable Gerbil tunneling: answer yes if you plan to expose homelab/office services via tunnels
Take a note of the setup token.
SMTP and CrowdSec
- SMTP is optional. You can skip at first and configure later.
- CrowdSec is offered as an optional hardening step. The docs recommend leaving it disabled for initial setup to keep the stack simpler for now.
5) Verify the deployment
Check containers:
sudo docker ps
If something is restarting, Traefik logs are usually the fastest signal (DNS, ACME, port conflicts):
sudo docker compose logs -f traefik
Common failures:
- Port 80/443 already in use
- DNS not pointing to the VPS
- Provider firewall blocks port 80 during ACME validation
6) Web-based first login
Now you can open your browser and go to the Pangolin UI:
https://pangolin.example.com/auth/initial-setup
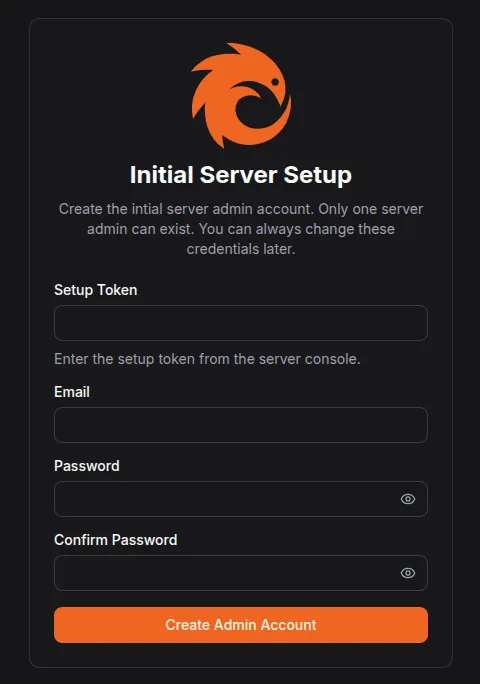
Create the admin account, log in, then create your first Organization.
Exposing services using a Newt Tunnel
Concept: Sites and Resources
- A Site represents a network location where upstream services live (homelab, office LAN, a Docker host).
- A Resource is a published entrypoint:
public FQDN>site target (IP:port)plus policy and auth.
7) Add a Site using Newt Tunnel
In the Pangolin dashboard: Sites > Add Site
Site types (how to choose)
- Newt Tunnel (recommended): run Newt in the remote network; no manual WireGuard/NAT work.
- Local Site: upstream apps live on the Pangolin VPS itself.
- Basic WireGuard: you manage WireGuard/routing manually, usually unnecessary if Newt fits.
For most cases, choose Newt Tunnel. Newt is explicitly designed to avoid the hand-built WireGuard + NAT complexity.
When you save the site, Pangolin generates:
NEWT_IDNEWT_SECRETPANGOLIN_ENDPOINT(your dashboard URL)
Treat these as credentials.
8) Deploy Newt inside your homelab/office network
On a machine that can reach your internal services (your Docker host), deploy a new stack using the generated compose and start it.
Example (use your real values from the UI):
services:
  newt:
    image: fosrl/newt:latest
    container_name: newt
    restart: unless-stopped
    environment:
      - PANGOLIN_ENDPOINT=https://pangolin.example.com
      - NEWT_ID=xxxxx
      - NEWT_SECRET=yyyyy
Optional: Docker socket integration
If you mount the Docker socket, Pangolin can query container metadata through Newt for inspection and targeting (useful for container-heavy setups).
Example (read-only socket mount):
services:
  newt:
    image: fosrl/newt:latest
    container_name: newt
    restart: unless-stopped
    volumes:
      - /var/run/docker.sock:/var/run/docker.sock:ro
    environment:
      - PANGOLIN_ENDPOINT=https://pangolin.example.com
      - NEWT_ID=xxxxx
      - NEWT_SECRET=yyyyy
      - DOCKER_SOCKET=unix:///var/run/docker.sock
Verify the tunnel is up
Back in the dashboard > Sites
- Status should move from Offline to Online shortly after Newt starts.
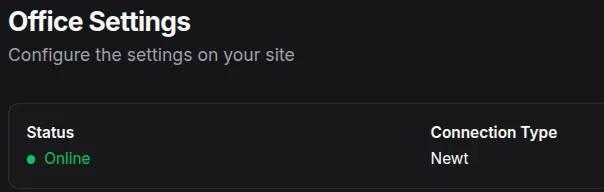
If it stays offline, check:
- VPS UDP 51820 reachability
- Provider firewall rules
- Newt container logs on the site host
Publish your first app (Resource)
9) Create a Resource
Dashboard: Resources > Add Resource
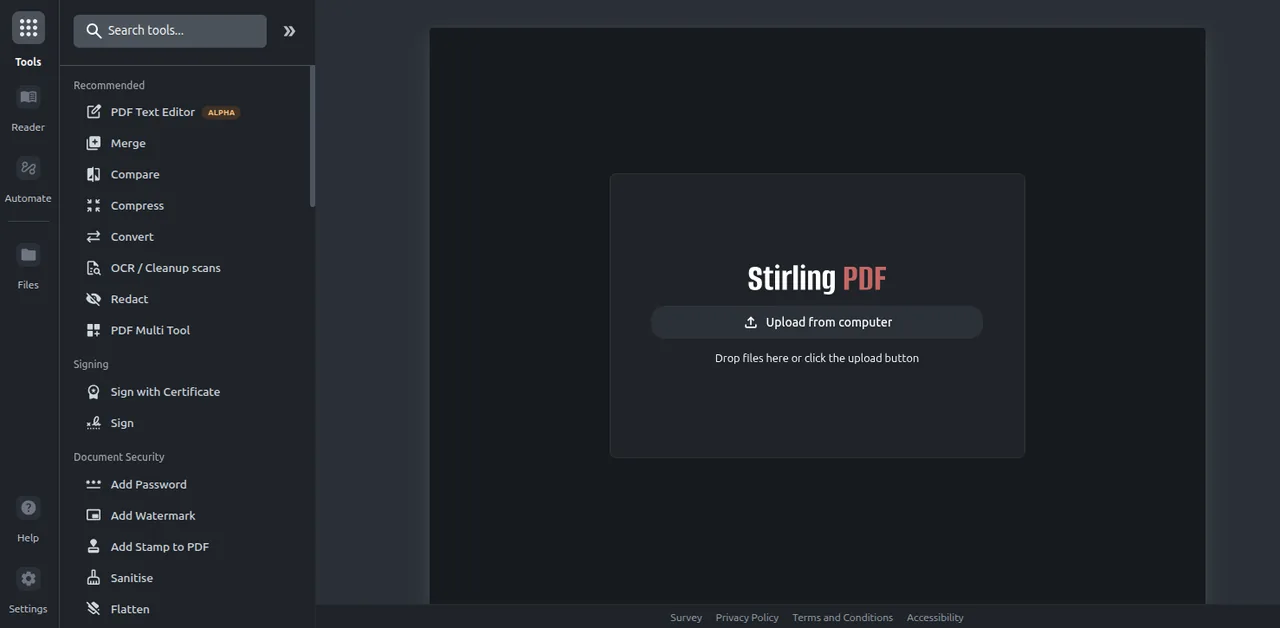
Example: publishing Stirling-PDF
- Name:
StirlingPDF - Type: HTTP (use this if the upstream is plain HTTP; TLS is terminated at the VPS)
- Domain:
pdf.example.com - Site: select your homelab site
- Target:
192.168.10.20:8123(replace with your actual host and port)
Save.
That's it, your service is now tunnelled (without SSL, this will be covered in the next step). You can visit pdf.example.com:
10) DNS for the Resource hostname
Create DNS for pdf.example.com:
pdf>A>VPS_PUBLIC_IP
If you created a wildcard record (*.example.com), you do not need per-app records, but verify your wildcard is correct.
As with the dashboard domain, keep Cloudflare in DNS only during initial issuance if you are using HTTP-01 validation.
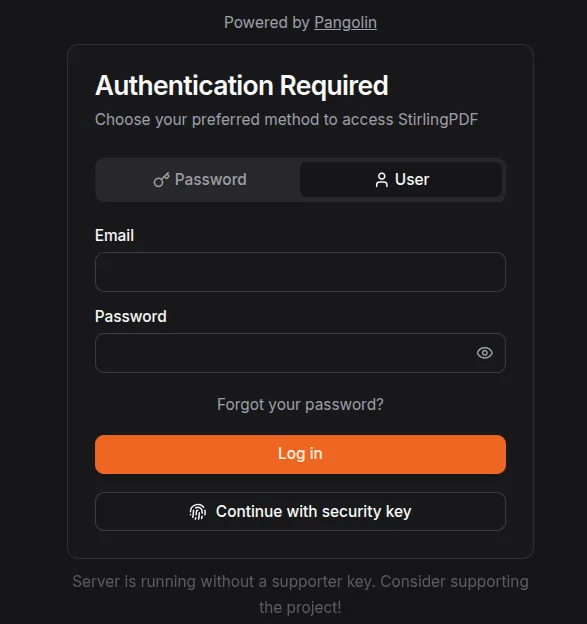
11) Authentication and access control
One of Pangolin's key differentiators versus a basic reverse proxy stack is that resources can be identity-gated at the edge, allowing users to authenticate to Pangolin, then access resources based on roles/policies.
In the Resource's Authentication tab:
- Start with a simple role assignment so only authenticated users can access the app.
- Later, integrate an IdP (OIDC) if you want SSO and centralized lifecycle management.
Closing
With Pangolin, you still get the single public entrypoint + outbound site connectors ergonomics that make Cloudflare Tunnel attractive, but you host the control plane and keep the trust boundary under your control. The tradeoff is that your VPS becomes security-critical infrastructure: lock it down, monitor it, and keep it updated.
If you find Pangolin useful, consider supporting the project.