This guide walks you through spinning up a phishing simulation lab using GoPhish, Cloudflare Tunnel for secure public access, and Zoho Mail for sending test campaigns. Ideal for internal awareness training or red team environments.
Basic Server Preparation
First, update your system and install the required packages:
sudo apt update && sudo apt upgrade -y
sudo apt install unzip curl -y
Before exposing anything publicly, lock down your server using ufw to allow only traffic from Cloudflare and block direct IP access to sensitive ports like :3333 (GoPhish Admin) and :80 (landing pages).
Enable UFW
sudo apt install ufw -y
sudo ufw default deny incoming
sudo ufw default allow outgoing
Allow SSH
sudo ufw allow ssh
Allow Cloudflare IP Ranges (optional but recommended)
Cloudflare publishes its IP ranges here: https://www.cloudflare.com/ips/
You can allow only these IPs to reach your server:
# Example for IPv4
sudo ufw allow from 173.245.48.0/20 to any port 80 proto tcp
sudo ufw allow from 173.245.48.0/20 to any port 3333 proto tcp

# Repeat for other Cloudflare IP blocks
This ensures that only traffic routed through your Cloudflare Tunnel is allowed and direct access to your server’s IP is blocked.
Step 4: Enable UFW
sudo ufw enable
sudo ufw status verbose
Now your GoPhish Admin Panel (
:3333) and landing pages (:80) will only be accessible via your custom Cloudflare hostname, not via raw IP.
Install GoPhish
Download and extract GoPhish:
curl -LO https://github.com/gophish/gophish/releases/download/v0.12.1/gophish-v0.12.1-linux-64bit.zip
unzip gophish-*.zip
cd gophish
chmod +x gophish
Before launching, edit the admin interface config:
nano config.json
Find:
"admin_server": {
  "listen_url": "127.0.0.1:3333",
Change it to:
"admin_server": {
  "listen_url": "localhost:3333",
Important:
localhostand127.0.0.1behave differently with Cloudflare Tunnel. Stick tolocalhosthere.
Then launch GoPhish:
sudo ./gophish
- Admin UI:
https://localhost:3333 - Campaign listener:
http://0.0.0.0:80
Set Up Cloudflare Tunnel
Download and install cloudflared:
curl -L https://github.com/cloudflare/cloudflared/releases/latest/download/cloudflared-linux-amd64.deb -o cloudflared.deb
sudo dpkg -i cloudflared.deb
Create your tunnel:
cloudflared tunnel create gophish-tunnel
This generates a unique Tunnel ID and credentials JSON file (e.g., 3fe86d07-...json).
Tunnel Configuration
Create your config at /etc/cloudflared/config.yml:
tunnel: <Tunnel ID>
credentials-file: /etc/cloudflared/<Tunnel ID>.json

ingress:
  - hostname: gophish.yourdomain.com
    service: http://localhost:3333
  - service: http_status:404
Move files into place:
sudo mv ~/.cloudflared/* /etc/cloudflared/
sudo chown -R root:root /etc/cloudflared
Install the systemd service:
sudo cloudflared --config /etc/cloudflared/config.yml service install
sudo systemctl enable cloudflared
sudo systemctl start cloudflared
Verify with:
sudo cloudflared --config /etc/cloudflared/config.yml tunnel run
Cloudflare DNS
In the Cloudflare Dashboard:
- Add a CNAME for
gophish.yourdomain.compointing to your tunnel ID (e.g.your-tunnel-id.cfargotunnel.com) - Set SSL to Full
Visit https://gophish.yourdomain.com to access the GoPhish admin panel.
Run GoPhish as a Service
Create a systemd service:
sudo nano /etc/systemd/system/gophish.service
Paste:
[Unit]
Description=GoPhish Phishing Framework
After=network.target

[Service]
Type=simple
ExecStart=/root/gophish/gophish
WorkingDirectory=/root/gophish
Restart=always
RestartSec=5
User=root

[Install]
WantedBy=multi-user.target
Enable and start:
sudo systemctl daemon-reexec
sudo systemctl daemon-reload
sudo systemctl enable gophish
sudo systemctl start gophish
Check status to get the admin credentials:
sudo systemctl status gophish
Email Sending with Zoho Mail
Step 1: Setup Zoho
- Go to zoho.com/mail
- Click Get Started under Business Email → choose Free Plan
- Sign up or log in
Step 2: Add Your Domain
- Choose Cloudflare as your DNS manager
- Add TXT record in Cloudflare to verify ownership
Step 3: Configure DNS Records
In Cloudflare DNS settings, add Zoho's required MX, SPF, and DKIM records.
If using Cloudflare Email Routing. remove and disable it after initial account verification to avoid MX record conflicts.
Verify all DNS records in the Zoho Admin Console under Mail Settings.
Step 4: Create SMTP App Password
- Log in to Zoho Mail
- Go to Security → App Passwords
- Generate a new app password and save it
Step 5: Add Sending Profile in GoPhish
In GoPhish → Sending Profiles > New Profile:
- Name: your Zoho email
- Interface Type: SMTP
- SMTP From: your Zoho email
- Host:
smtp.zoho.eu:587 - Username: your Zoho email
- Password: app password
- ✅ Uncheck "Ignore Certificate Errors"
Send a test email to confirm.
Launch Your First Campaign
1. Create Users & Groups
Go to Users & Groups, add a group and at least one test user.
2. Configure Tunnel for Public Landing Page
Add a new ingress route in your Cloudflare Tunnel config:
- hostname: campaign.yourdomain.com
  service: http://0.0.0.0:80
Restart the tunnel if needed:
sudo systemctl restart cloudflared
3. Email Template Example
<!DOCTYPE html>
<html>
  <body style="font-family: Arial, sans-serif; color: #333;">
    <p>Dear {{.FirstName}},</p>

    <p>We’ve detected unusual activity on your account and require you to confirm your login credentials to avoid temporary suspension.</p>

    <p>Please verify your account by clicking the link below:</p>

    <p>
      <a href="{{.URL}}" style="background-color:#007bff; color:white; padding:10px 15px; text-decoration:none; border-radius:5px;">
        Verify Now
      </a>
    </p>

    <p>If you do not verify within 24 hours, your account access may be restricted.</p>

    <p>Thank you,<br>The Security Team</p>

    <hr>
    <p style="font-size: 12px; color: gray;">This is an automated message. Please do not reply directly to this email.</p>
  </body>
</html>
4. Landing Page Example
Use this for capturing clicks and credentials:
<!DOCTYPE html>
<html lang="en">
<head>
  <meta charset="UTF-8" />
  <meta name="viewport" content="width=device-width, initial-scale=1.0"/>
  <title>Secure Login</title>
  <style>
    body {
      background-color: #f4f6f8;
      font-family: Arial, sans-serif;
      display: flex;
      justify-content: center;
      align-items: center;
      height: 100vh;
    }
    .login-container {
      background-color: white;
      padding: 40px;
      border-radius: 8px;
      box-shadow: 0 0 10px rgba(0,0,0,0.1);
      width: 100%;
      max-width: 400px;
    }
    .login-container h2 {
      margin-bottom: 20px;
      text-align: center;
      color: #333;
    }
    input[type="email"],
    input[type="password"] {
      width: 100%;
      padding: 12px 10px;
      margin: 10px 0;
      border: 1px solid #ccc;
      border-radius: 5px;
    }
    button {
      width: 100%;
      padding: 12px;
      background-color: #007bff;
      color: white;
      border: none;
      border-radius: 5px;
      font-size: 16px;
      margin-top: 15px;
      cursor: pointer;
    }
    .note {
      margin-top: 15px;
      font-size: 12px;
      color: gray;
      text-align: center;
    }
    .popup {
      display: none;
      position: fixed;
      top: 0; left: 0;
      width: 100%; height: 100%;
      background: rgba(0,0,0,0.4);
      justify-content: center;
      align-items: center;
    }
    .popup-content {
      background: white;
      padding: 30px;
      border-radius: 10px;
      text-align: center;
      box-shadow: 0 0 20px rgba(0,0,0,0.3);
    }
  </style>
</head>
<body>
  <div class="login-container">
    <h2>Secure Portal</h2>
    <form id="phishForm" method="POST" action="/login">
      <input type="email" name="email" placeholder="Email address" required />
      <input type="password" name="password" placeholder="Password" required />
      <button type="submit">Sign In</button>
    </form>
    <p class="note">© 2025 Corporate Systems. All rights reserved.</p>
  </div>

  <div class="popup" id="popup">
    <div class="popup-content">
      <h3>Verification Complete</h3>
      <p>Your identity has been successfully verified.<br>You may close this window.</p>
    </div>
  </div>

  <script>
    document.getElementById("phishForm").addEventListener("submit", function(e) {
      e.preventDefault(); // Prevent redirect
      const form = e.target;

      // Send the credentials to GoPhish
      fetch(form.action, {
        method: "POST",
        body: new FormData(form)
      });

      // Show fake confirmation popup
      document.getElementById("popup").style.display = "flex";

      // Optional: Redirect after a delay
      setTimeout(() => {
        window.location.href = "https://www.office.com"; // Change to your desired redirect
      }, 3000);
    });
  </script>
</body>
</html>
Add a confirmation popup or redirect after form submission to mimic a real login flow.
5. Create Campaign
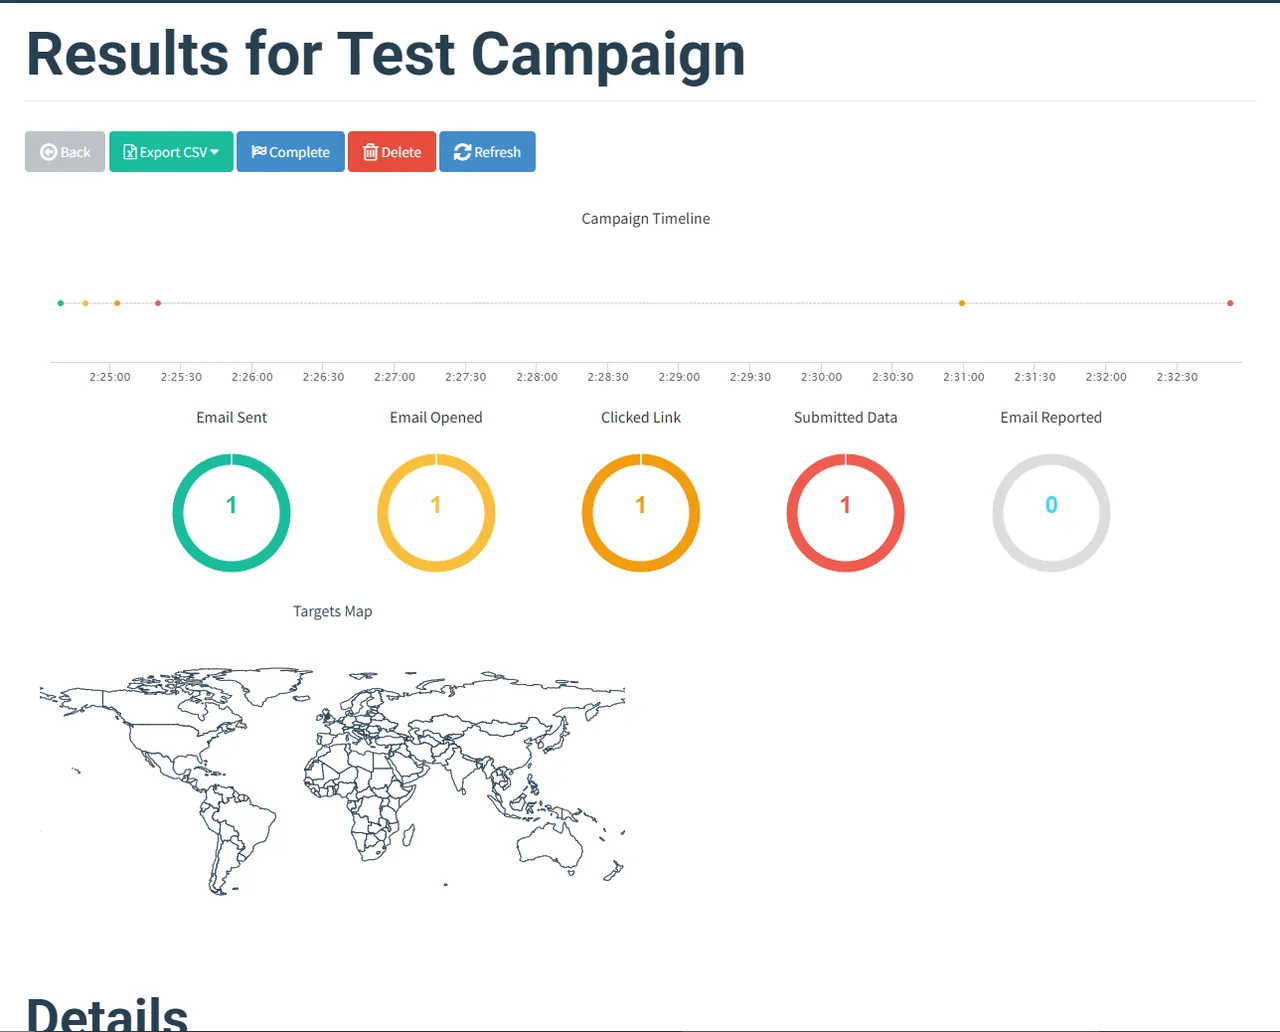
Go to Campaigns > New:
- Name: Anything identifiable
- Email Template: Your crafted email
- Landing Page: Your phish page
- URL: Your public domain (e.g.
https://campaign.yourdomain.com) - Sending Profile: Zoho
- Group: Your test user group
Schedule and launch! Use this responsibly.