Access Internal Resources Remotely - WireGuard VPN Guide
A guide for setting up a VPN for secure, private access in SMBs and home networks, utilizing state-of-the-art encryption and cross-platform support.
Contents
What is a VPN?
A Virtual Private Network (VPN) operates by establishing a secure, encrypted tunnel between a client and a server over the internet. This tunnel encapsulates and encrypts all network traffic, ensuring confidentiality and integrity. VPN protocols, such as WireGuard, use advanced encryption standards like AES and public key cryptography for authentication, ensuring that only authorized users can access the VPN.
What is WireGuard?
WireGuard is a modern VPN protocol that aims to provide a simpler, faster, and more secure solution compared to older VPN protocols like OpenVPN and IPSec. It was created by Jason A. Donenfeld and has gained significant popularity due to its unique blend of simplicity and performance. Key features and characteristics:
- Simplicity and Lightweight: WireGuard has a much smaller codebase (around 4,000 lines of code) compared to other VPN protocols. This not only makes it easier to implement and manage but also more straightforward to audit for security vulnerabilities.
- State-of-the-Art Cryptography: It utilizes modern cryptographic techniques such as the Noise protocol framework, Curve25519, ChaCha20, Poly1305, BLAKE2s, SipHash24, and HKDF. These are well-regarded in the cryptographic community for their security and performance.
- Performance: Due to its lightweight design and efficient cryptographic primitives, WireGuard offers high performance. This can mean faster connection establishment, lower latency, and better throughput compared to older VPN solutions.
- Cross-Platform Support: WireGuard supports a wide range of platforms including Windows, macOS, BSD, iOS, Android, and Linux. This makes it versatile for various user environments.
- Ease of Configuration: WireGuard aims to be user-friendly with simple configuration compared to the complexity often encountered in setting up other VPN protocols.
- Improved Security Model: Its design philosophy includes the principle of least privilege, ensuring that each part of the system has only the privileges it needs to function. This reduces the potential attack surface.
- IP Roaming: WireGuard handles changes in the network environment gracefully. For instance, if a user switches from a Wi-Fi network to a mobile data network, the connection is maintained seamlessly.
- Privacy-Oriented: WireGuard does not store persistent connection states, which is a design choice for privacy. This means it doesn't store data about client sessions, reducing the risk of sensitive data being exposed.
Wireguard VPN compared to Exposed Ports and Cloudflare Tunnels
- WireGuard VPN: WireGuard offers state-of-the-art encryption (like the Noise protocol framework, Curve25519, ChaCha20, Poly1305, BLAKE2, SipHash24, HKDF, and secure trusted constructions). This encryption is significantly more robust compared to just exposing ports without any additional security layer. It's also considered more efficient and faster than older protocols like OpenVPN and IPSec. With a self-hosted VPN, you have complete control over your data and traffic. This is critical for privacy as your data does not pass through third-party servers (unlike many VPN services).
- Exposing Ports: Simply exposing ports can be risky. Without additional security measures like a VPN, these ports could be vulnerable to attacks such as port scanning, brute force, or exploitation of any service-specific vulnerabilities. Offering no inherent privacy features, exposing ports means any data transmitted is as private as the application protocol used (like HTTP vs. HTTPS).
- Cloudflare Tunnels: Cloudflare provides secure tunnels to expose your services to the internet without exposing the ports directly. It uses Cloudflare's infrastructure for encryption and DDoS protection. However, this implies a level of trust in Cloudflare’s infrastructure and does not encrypt internal traffic within your network.
- Third-Party VPN: These services offer encryption like Cloudflare Tunnels, but using them means trusting the VPN provider with your data. While they secure your internet traffic, they may log activities depending on their policies and jurisdiction.
Overview
The end goal of this guide is to set up a secure VPN tunnel in a small business and medium-sized business (SMBs), or home environments. This step-by-step guide will cover all the necessary components and configurations to establish a WireGuard VPN, ensuring private and secure remote access to internal network resources.
Running your own VPN will allow for the following:
- Geo-IP spoofing: Like any other commercial VPN service, when connected to the VPN server, your client's IP will reflect the location of the VPN server. This means if your server is in a different geographical location, it will appear as if your internet traffic is originating from that location.
- Access to internal services: As the VPN is running internally, you can access internal services while the connection is active as if you were physically connected to the local network.
The following tools will be used:
- WG-Easy: A docker container with WireGuard and a Web UI.
- Unifi Network: This guide uses Unifi networking gear, but the steps will be similar to other vendors.
- No-IP: Dynamic DNS provider.
Requirements
- Dynamic DNS Provider - this is required if your network is behind CGNAT where a static IP is unavailable. This service dynamically updates DNS records to reflect the changing public IP address of your network.
- A Domain Name: You'll need a domain name to use with your DDNS service. This domain acts as a stable endpoint for establishing connections to your local WireGuard server and will be set up during the No-IP DDNS configuration.
- ISP Authorisation: Verify that your ISP's terms of service allow the running of a VPN server. Some ISPs may restrict or block VPN traffic.
- A secured machine, ready for Docker Installation - follow this guide's Preparing the Host and Hardening the Host sections.
Configuring Dynamic DNS Services
Setting up DDNS via NoIP.com
- Navigate to NoIP.com and create an account then sign in.
- Open Dynamic DNS > No-IP Hostnames > Create Hostname
- Important to note that No-IP offers free Hostnames (domain names) for their DDNS services, but the free tier requires you to log in once every 30 days to renew the domain. If this is inconvenient, you can upgrade to a paid plan where renewal is not required.
- Complete the fields as follows:
- Name: The subdomain you want to use (e.g.: vpn.mydomain.com)
- Domain: The Top-Level domain for the subdomain. (e.g.: vpn.mydomain.com).
- Record Type: A-record (DNS Host)
- IPv4 Address: Enter your current public IP.
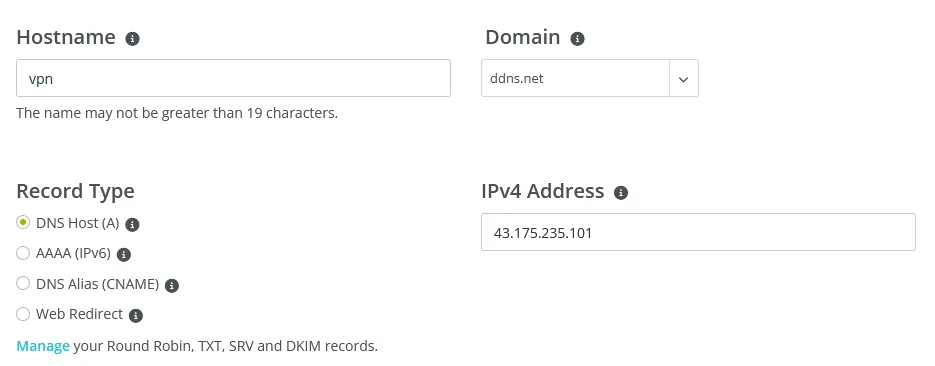
- Click 'Create Hostname'.
The DDNS record has been established. However, whenever there's a change in your dynamic IP, you're required to update the Target IP field with your new public IP by logging in manually. To eliminate the need for this manual process, the next step involves configuring DDNS services in the router. This setup will ensure the automatic update of your dynamic IP in No-IP whenever there's an IP change.
Setting up DDNS on the Router
As mentioned before, the steps below are specific to Unifi UDM Pro routers. For your router, Google "DDNS setup
- Sign in to UDM Pro and navigate to Settings > Internet > WAN 1 > Dynamic DNS > Create New Dynamic DNS.
- Complete the fields as follows:
- Service: noip
- Hostname: The subdomain and domain you chose when setting up No-IP (eg.: vpn.mydomain.com).
- Username and Password: Your No-IP credentials.
- Server: leave blank.
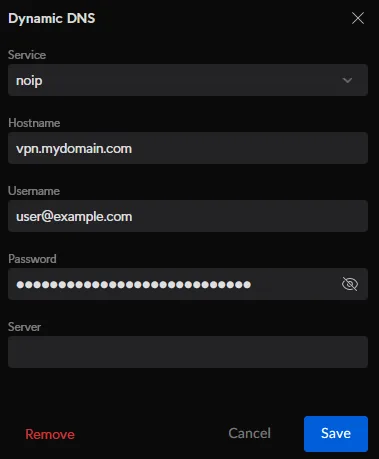
- Click 'Create'.
Dynamic DNS is now set up, but does not currently point to any services. Let's deploy WireGuard.
Deploying WireGuard
Installing Docker and Docker Compose on the host machine
- Install Docker and Docker Compose.
- Verify Docker is running.
sudo apt update
sudo apt install apt-transport-https ca-certificates curl software-properties-common
curl -fsSL https://download.docker.com/linux/ubuntu/gpg | sudo apt-key add -
sudo add-apt-repository "deb [arch=amd64] https://download.docker.com/linux/ubuntu $(lsb_release -cs) stable"
sudo apt update
sudo apt install docker-ce
sudo apt-get install docker-compose-plugin

docker-compose --version
sudo systemctl status docker
Installing WG-Easy via Docker Compose
- Create a folder for the docker compose yml.
- Create the compose.yml file.
- Spin up docker compose.
cd ~
mkdir vpn_docker
cd vpn_docker
nano compose.yml
version: "3.8"
volumes:
  etc_wireguard:

services:
  wg-easy:
    environment:
      - LANG=en
      - WG_HOST=vpn.mydomain.com #Update with your domain name.
      - PASSWORD=TNCHfeIHjqfrYrd #Used for WebUI, change it.
      - WG_PORT=51820
      - WG_DEFAULT_ADDRESS=10.10.10.x #The default range, make sure this range is not by any other client and is not defined as a VLAN in your router.
      - WG_DEFAULT_DNS=10.1.1.11, 10.1.1.10 #Default DNS servers used by the clients. If you use your internal DNS with local DNS records, specify this to allow access to the internal services through DNS (and Reverse Proxy if set up).
      - WG_MTU=1420
      - WG_ALLOWED_IPS=10.1.1.0/24 #IP range allowed to access by the clients.
      - WG_PERSISTENT_KEEPALIVE=25
      - UI_TRAFFIC_STATS=true
      - UI_CHART_TYPE=1

    image: ghcr.io/wg-easy/wg-easy
    container_name: wg-easy
    volumes:
      - etc_wireguard:/etc/wireguard
    ports:
      - "51820:51820/udp"
      - "51821:51821/tcp"
    restart: unless-stopped
    cap_add:
      - NET_ADMIN
      - SYS_MODULE
    sysctls:
      - net.ipv4.ip_forward=1
      - net.ipv4.conf.all.src_valid_mark=1
- Save the compose.yml file and exit with CTRL+X, Y.
- Deploy the container:
docker-compose up -d
docker ps
Configuring the Network
In order to allow traffic to be routed from outside the network to Wireguard, two settings will need to be configured:
- Static Route: directs traffic to the correct destination within the network.
- Port Forwarding: allows external requests to reach WireGuard through DDNS. Even though a port is open, it's not vulnerable to scanning or unauthorized access because Wireguard requires the correct cryptographic keys for any successful connection. Without the proper keys, unauthorized users cannot establish a connection, effectively making the open port invisible or inaccessible to them.
Again, the steps below are specific to the UDM Pro, but these common settings can be found in every modern router. Google "Port Forwarding
Setting Up the Static Route:
- Sign in to UDM Pro and navigate to Settings > Routing > Static Routes > Create Entry.
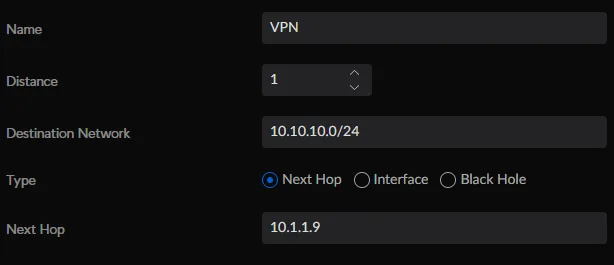
- Complete the fields as follows:
- Name: VPN
- Distance: 1
- Destination Network: 10.10.10.0/24
- Type: Next Hop
- Next Hop: IP address of Docker Host
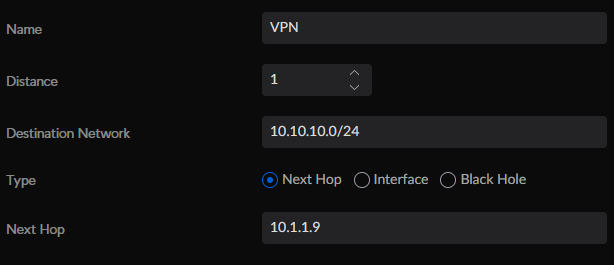
- Click 'Add Entry' to save it.
Opening the Network Port:
- Sign in to UDM Pro and navigate to Settings > Security > Port Forwarding > Create Entry.
- Complete the fields as follows:
- Name: VPN
- Forward Rule: Checked
- Interface: WAN
- From: Any
- Port: 51820
- Forward IP: IP address of Docker Host
- Forward Port: 51820
- Protocol: UDP
- Logging: Enabled
- Click 'Add Entry' to save it.
Creating the First Client
Configuring Clients with WG-Easy
At this point WireGuard is ready to be used. Let's issue the first connection file. WireGuard operates with configuration files that are created on your WireGuard server and issued to the devices you wish to connect. Using the server's public key and the desired client IP address and allowed IPs, generate a new client configuration file on the server. This file will contain information such as the client's private key, the server's public key, the client's endpoints (IP addresses or hostnames), and the allowed IPs for the client.
- Navigate to
:51821 in your web browser to access WG-Easy's UI.
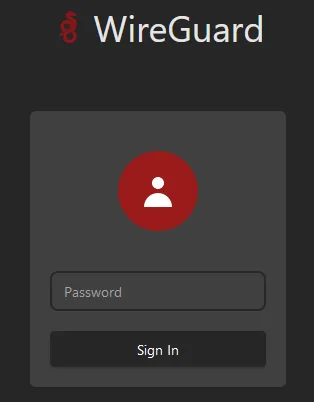
- Sign in using the password specified in the Docker Compose.
- Click 'New' to set up a new client.
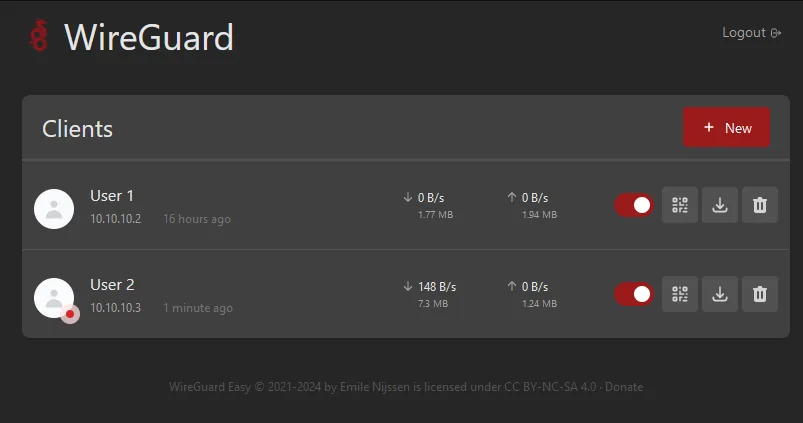
- Enter any name and click 'Create'.
Connecting from clients:
There are two ways to connect from client devices. Either connection method requires the WireGuard app to be installed on the client. The clients can be downloaded from here or the respective App Store of your device. After installing and opening the WireGuard app on your client device, use one of the following methods to connect to your VPN server:
- Connect with QR code: Click the QR code button in the Web UI, and scan the QR code using your endpoint's camera to save the configuration file.
- Configuration File: Download the .conf file from the Web UI and distribute it to the client, then import it into the WireGuard app on your client.
Conclusion
In this guide, we've explored the basic steps to set up a WireGuard VPN. WireGuard stands out with its high performance, making it an excellent choice for both small and medium-sized businesses, as well as for home network environments. By following the outlined steps, you can ensure a secure, private connection to your internal network resources, regardless of your location.
Remember, the key to maintaining a secure network is not just in the setup but also in regular monitoring and updates.